Anyone adding audio on earlier versions of Microsoft Internet Explorer, such as IE8, you doubtlessly aware of some of the pit-falls with placing/embedding MP3 audio on an HTML page, running on IE8. Sure, you can embed the MP3 file easily enough; but to
play it, users will need to 1) have a 'helper' plug-in already installed (such as Quicktime Player or other); or 2) download such a helper plug-in.
It works, but let's be honest: it's not the
prettiest (or most efficient) way of allowing your audience to play the media file associated with your page.
On the other hand, if we were able to code this page using HTML5's <audio> tag, everything would go swimmingly. Alas, as you know, we are not able to use HTML5 coding in IE8.
So what next? Certainly, there are also code libraries one can 'Google' that promise to 'shoehorn' MP3 audio and a player within the confines of IE8's digital limbo. As always, some initial learning (of the new code) and testing (the new code on your target platform) will be needed with using one of the remedies. Aside from these, let's look at a solution possibly closer to 'home' for us developers.
This particular solution utilizes built-in tools inside
Dreamweaver, so you will need to have access to that software and be familiar with how to use (in general), to make this fix work. I don't suggest Dreamweaver is the
penultimate way to code, but it works well and just happens to be the coding IDE I used for a particular project that needed such audio interactivity...without the overhead of an additional plug-in (well, sorta...more on that in a moment).
Additionally, access to media converter is needed for this fix. Yes, we are going to change the MP3 filetype to something else.
"But, isn't that cheating?", you may ask. Yes...yes, it is. However, the important part is that visitors to our webpage be able to play the audio seamlessly with our 'fixes' working invisibly in the background. Like magic.
Except, unlike magic, I will tell you the secrets and inner-workings of my tricks, so that you might benefit from my trial-error-sessions. So, let's get started. :)
- Convert MP3 audio to FLV
Using Adobe Media Encoder (or any similar software), convert the MP3 audio to FLV audio-only files. Use settings similar to these:
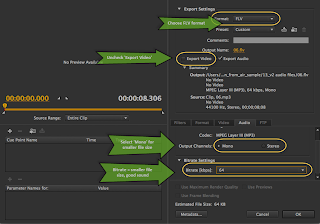 |
| Click on the image to enlarge |
- Insert new FLV in Dreamweaver
Use these setting:
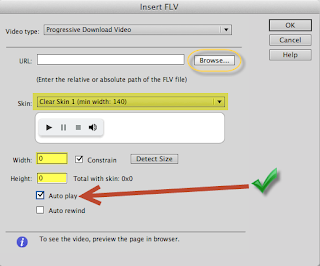 |
| Click on the image to enlarge |
We want this to 'invisible', so set pixels to '0,0' and select the 'Auto play' checkbox. Why? While, we can either chose to have the media play automatically once the user opens our HTML page, we are going to add Javascript code to allow the user to play our audio on a click event.
Conversely, instead of creating a clickable object - such as link, button, or other - we could simply use the FLV player controls, provided by Dreamweaver. However, my particular project needed audio to play only on the click of a specific image, not a 'Play' button (as is the case with the FLV player controls.
Be sure to note which player skin you choose. While the actual player will not matter in this particular workaround (since we are setting the dimensions to zero), you will need to include this SWF file in the upload to wherever your final HTML files are housed or hosted, so that the audio will play. And speaking of files needed for upload...
- Note the additional JavaScript code Dreamweaver creates
To facilite this new insertion of a FLV/SWF object, Dreamweaver automatically adds a new JS page ('swfobject_modified.js') and inserts a reference link to it, inside your HTML code. While you can experiment and test with whether this new JavaScript code is needed by our new audio (I don't think it is), let's leave it for now, to continue with our (mostly) hands-off approach.
- Create a <div> 'container'
Now, we are going to contain our new FLV player code inside a <div> with a specifi <id> element. We do so to be able to manipulate this container code - and thereby all the FLV player code inside it - via Javascript function. Give the <id> a name you can easily recall for creation of the JS function in a moment.
<div id="myMP3" style="display:none">
<object classid="clsid:D27CDB6E-AE6D-11cf-96B8-444553540000" width="0" height="0" id="FLVPlayer">
... then after new code ...
    <!--[if !IE]>-->
  </object>
  <!--<![endif]-->
</object>
</div>
Note that we have given our <div> a specific style attribute, setting display to 'none'. Our next step will illustrate why doing so is important.
- Add button or other object to Play Audio
To clarity, we will use a <button> object, however any clickable item or other HTML object that invoke a JavaScript function can be used.
You can place the button code anywhere inside the <body> tags, either before or after all of the code, but be sure to place it outside of the <div> we just created.
- Create JavaScript function
Now the secret sauce to our workaround. We will create a simple function to change our <div> display from "none" to "block". While several schools of thought debate where the best place to put JavaScript inside an HTML (...and even many that decry putting any JS within HTML code, maintaining that it must be placed outside the code, in it's own file for maximum efficacy...), we will place our new JS code, at the 'bottom' of the HTML code, just before the last <body> tag.
<script>
function playMP3(){
 document.getElementById("myMP3").style.display = "block";
}
</script>
This enables all of the code inside our custom <div> to not only become visible on the page (*if we could see any of it; remember that we set the dimensions to zero), but it also allows the HTML page to make the code 'active'. Once active, our FLV code plays the audio file, because we set it to 'auto play', in our earlier step.
- Invoke JS function
Using our button, we now fire off the new JavaScript function, allowing our audio to play.
<button onclick="javascript:playMP3();">PLAY</button>
That's it. Our audio should now play when the user clicks the play button...even in IE8. Sure: this workaround
doesn't use the MP3 filetype, but(!) rather we use Dreamweaver's existing FLV player to cheat this shortcoming, and to give IE8 something it knows what to do with: FLV/SWF files.
Of course, another option - and, perhaps one just as quick - would be to create a custom Flash (SWF) interaction, that plays MP3 audio when triggered (i.e., clicked, whatever). Certainly, this is an acceptable pipeline to consider, especially if you have Adobe Flash IDE.
This SWF could also be controlled via HTML/JavaScript (outside of the SWF itself). To do so, one would also need to include ActionScript code within the Flash environment that exposed its Flashvars to JavaScript commands.
However, this is exactly what our Dreamweaver shortcut does: it creates a SWF for us: one that houses our media (the new FLV) and is controlled inside the HTML...only we didn't have to (additionally) open up and code within the Flash IDE. Use the extra time to sit back, relax, and have a tasty bev.
Cheers! :)
 Learning Articulate Storyline by Stephanie Harnett